Crunchy Delights: A Step-by-Step Guide to Making and Using Breadcrumbs for Irresistible Dishes
Breadcrumbs are a versatile ingredient that can add texture, flavor, and depth to a wide range of dishes. These tiny golden nuggets are made from dried bread that has been ground or crushed into fine crumbs. They have been used in cooking for centuries and are a staple in many cuisines around the world.
Breadcrumbs serve several purposes in cooking. They can be used as a coating for fried or baked foods, providing a crispy outer layer. They also act as a binder in meatballs, meatloaf, and other mixtures, helping to hold the ingredients together. Additionally, breadcrumbs can be added to fillings, stuffings, and toppings to add crunch and absorb excess moisture.
While store-bought breadcrumbs are readily available, making your own at home offers numerous benefits. Homemade breadcrumbs allow you to control the quality of the bread used and avoid any unwanted additives or preservatives. It's also an excellent way to use up stale bread that might otherwise go to waste.
In the next sections of this article, we will guide you through the process of making homemade breadcrumbs step by step. We will also explore creative ways to incorporate breadcrumbs into your cooking repertoire and provide tips on storing and freezing them for future use. So let's dive in and discover how these humble crumbs can elevate your dishes to new heights!
Benefits of Making Homemade Breadcrumbs
Making homemade breadcrumbs offers several advantages over store-bought options. Firstly, it allows you to control the quality and freshness of the ingredients used. By using high-quality bread, you can ensure that your breadcrumbs are flavorful and free from additives or preservatives.
Additionally, homemade breadcrumbs are a great way to reduce food waste. Instead of throwing away stale bread, you can transform it into a useful ingredient for various dishes. This not only helps the environment but also saves money in the long run.
Moreover, making your own breadcrumbs gives you the freedom to customize their texture and flavor. Whether you prefer coarse or fine crumbs, seasoned or plain, you have complete control over the end result. This versatility allows you to tailor your breadcrumbs to suit different recipes and personal preferences.
Lastly, using homemade breadcrumbs adds a unique touch to your cooking. The love and effort put into creating them can be tasted in every bite. They lend a distinct crunchiness and depth of flavor that elevates any dish they are added to.
In conclusion, making homemade breadcrumbs provides numerous benefits such as quality control, reduction of food waste, customization options, and enhanced taste. So why settle for store-bought when you can easily create these crunchy delights at home?
Step-by-Step Guide to Making Breadcrumbs
1. Choose the Right Bread: Start by selecting a bread that suits your taste preferences. Stale bread works best as it will be easier to grind into breadcrumbs.
2. Cut and Dry: Slice the bread into small pieces or cubes, ensuring they are evenly sized. Place them on a baking sheet and let them dry out completely. This can take anywhere from a few hours to overnight.
3. Toasting Time: Preheat your oven to 300°F (150°C). Spread the dried bread evenly on a baking sheet and toast for about 15-20 minutes until golden brown. Keep an eye on them to prevent burning.
4. Cool and Grind: Allow the toasted bread to cool completely before grinding it into breadcrumbs. You can use a food processor, blender, or even a mortar and pestle for this step. Pulse until you achieve your desired consistency, whether fine or coarse.
5. Optional Seasonings: If you want to add extra flavor to your breadcrumbs, now is the time! Mix in herbs like parsley, thyme, or oregano, along with spices such as garlic powder or paprika.
6. Store and Use: Transfer the homemade breadcrumbs into an airtight container or resealable bag for storage. They can be kept at room temperature for up to two weeks or in the freezer for several months.
By following these simple steps, you can create flavorful homemade breadcrumbs that will elevate your dishes and add that irresistible crunch factor!
Creative Ways to Use Breadcrumbs in Cooking
1. Crispy Coating: Use breadcrumbs to create a crispy coating for your favorite dishes like chicken tenders, fish fillets, or even vegetable fritters. Simply dip the food in beaten egg, coat it with seasoned breadcrumbs, and fry until golden brown.
2. Flavorful Stuffing: Breadcrumbs are a key ingredient in making delicious stuffings for poultry or vegetables. Combine them with sautéed onions, herbs, and spices to create a flavorful filling that adds texture and taste to your dishes.
3. Tasty Toppings: Sprinkle breadcrumbs on top of casseroles or gratins before baking to add a delightful crunchy texture. This works particularly well with macaroni and cheese, baked vegetables, or creamy seafood dishes.
4. Meatballs and Meatloaf: Add breadcrumbs to your meatball or meatloaf mixture as a binder. They help absorb moisture and keep the meat tender while adding a light texture to these classic comfort foods.
5. Veggie Patties: When making vegetarian patties or burgers, breadcrumbs act as a binding agent that holds the ingredients together. They also give the patties a satisfying crunch when cooked.
6. Crunchy Crusts: Create irresistible crusts for quiches or savory pies by mixing breadcrumbs with melted butter and pressing them onto the bottom of the pie dish before adding the filling. The result is a crispy base that complements the flavors inside.
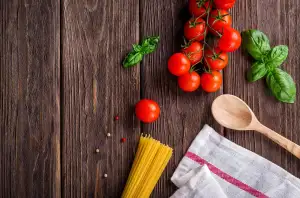
7. Breadcrumb Topping for Pasta: Toasted breadcrumbs can be used as an alternative to grated cheese on top of pasta dishes like spaghetti aglio e olio or baked macaroni. They add a unique texture and nutty flavor that pairs perfectly with pasta sauces.
Get creative in your kitchen by incorporating homemade breadcrumbs into these exciting recipes!
Tips for Storing and Freezing Breadcrumbs
Published: 07. 12. 2023
Category:
Food
Published: 07. 12. 2023
Category: Food